 cfix 1.1 introduces NT kernel mode unit tests
cfix 1.1 introduces a number of new features. The most important among these is the additional ability to write kernel mode unit tests, i.e. unit tests that are run in kernel mode. Needless to say, cfix 1.1 still supports user mode unit tests.
All contemporary unit testing frameworks focus on unit testing in user mode. Certainly, the vast majority of testing code can be assumed to be targeting user mode, so this does not come at a surprise. Tools for driver testing, of which there are quite a few, focus on integration testing – they usually test whether the driver works in its entirety.
While these tools are very useful indeed, they do not support true unit testing – i.e. offering the ability to test individual routines or subsystems of a driver. To perform such tests, it would be neccessary to write a separate test driver or revert to other techniques such as this one.
cfix 1.1 fills in this gap and offers the ability to write kernel mode tests. That way, individual parts of what may eventually become a driver can thoroughly be tested in isolation, without neccessitating much boilerplate code.
Example
Writing a kernel mode unit test is as easy as writing a user mode unit test – the API is the same for user and kernel mode tests. Even the tools, cfix32 and cfix64 are the same for both modi. The only true difference is that kernel mode tests require slightly different build settings.
The following listing shows an example for a kernel mode unit test – but the same code could just as well be compiled into a user mode unit test.
    #include <cfix.h>

    static void FixtureSetup()
    {
      CFIX_ASSERT( 0 != 1 );
    }

    static void FixtureTeardown()
    {
      CFIX_LOG( L"Tearing down..." );
    }

    /*++
      Test routine -- do the actual testing.
    --*/
    static void Test1()
    {
      ULONG a = 1;
      ULONG b = 1;
      CFIX_ASSERT_EQUALS_ULONG( a, b );
      CFIX_ASSERT( a + b == 2 );

      // You are free to use all WDM APIs here!

      CFIX_LOG( L"a=%d, b=%d", a, b );
    }


    /*++
      Define a test fixture.
    --*/
    CFIX_BEGIN_FIXTURE( MyFixture )
      CFIX_FIXTURE_ENTRY( Test1 )

      CFIX_FIXTURE_SETUP( FixtureSetup )
      CFIX_FIXTURE_TEARDOWN( FixtureTeardown )
    CFIX_END_FIXTURE()
Once built, the test can be run from the command line:
    C:\cfix\bin\i386>cfix32 -nologo -kern ktest.sys
    Module: ktest (ktest.sys)
      Fixture: MyFixture
        Test1
For a more detailed discussion and more example code, please refer to the tutorial.
Architecture
For user mode code, the cfix architecture roughly looks like this:
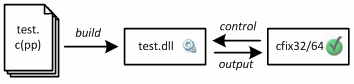
The tests are compiled into a DLL. Using the testrunner application cfix32 or cfix64, one or more fixtures defined in the DLL can be run and the results are reported to the console or to a log file.
For kernel mode code, the acrhitecture looks a little different. The tests are compiled into a driver rather than into a DLL. The driver is verly lightweight and, besides the tests, contains only very little cfix-provided code (basically, just a DriverEntry implementation).
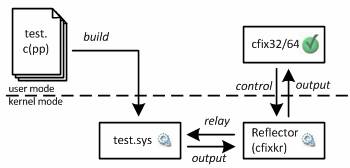
When cfix32 or cfix64 is requested to run a kernel mode tests, it will load the Reflector, a driver that contains the kernel mode fraction of the testing framework. Relaying control operation and output through the reflector, the kernel mode unit tests can be run.
All these additional steps are performed without additional user intervention – the drivers are installed, loaded and stopped automatically. From a user perspective, running a kernel mode tests feels just like running a user mode test.
More…
cfix 1.1 introduces additional new features. I will discuss some of them over the next weeks. In any case, whether you have not used cfix yet or are a cfix 1.0 user, you should go straight to the download page now.