 Authenticating to AWS by using a Google Cloud service account and AssumeRoleWithWebIdentity
By using workload identity federation, we can let applications use AWS credentials to authenticate to Google Cloud. That’s useful if we have an application that runs on AWS and needs access to Google APIs.
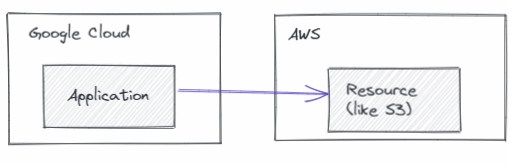
But what if we are in the opposite situation, where we have an application on Google Cloud that needs access to AWS?
In a case like that, we can use AWS’s AssumeRoleWithWebIdentity, which:
Returns a set of temporary security credentials for users who have been authenticated in a mobile or web application with a web identity provider. Example providers include Amazon Cognito, Login with Amazon, Facebook, Google, or any OpenID Connect-compatible identity provider.
...
The temporary security credentials returned by this API consist of an access key ID, a secret access key, and a security token. Applications can use these temporary security credentials to sign calls to AWS service API operations.
That’s exactly what we need in a situation where an application can obtain service account credentials on Google Cloud and needs AWS credentials. Conveniently, Google is among the providers AWS has built-in support for:
If you are using an OIDC identity provider from either Google, Facebook, or Amazon Cognito, do not create a separate IAM identity provider using this procedure. These OIDC identity providers are already built-in to AWS and are available for your use.
To let an application that runs on Google Cloud access AWS, we can therefore:
- Attach a service account to the underlying compute resource so that the application can obtain service account credentials.
Let the application fetch an ID token for the attached service account. The body of such an ID token looks like this:
{
    "aud": "aws-trust-1",
    "azp": "[email protected]",
    "email": "[email protected]",
    "email_verified": true,
    "exp": 1630927162,
    "iat": 1630923562,
    "iss": "https://accounts.google.com",
    "sub": "10036718611111111111"
}
Pass the ID token to
AssumeRoleWithWebIdentityto get temporary AWS security credentials (i.e., an Access Key ID, Secret Access Key, and a Session Token).Use the AWS security credentials to access AWS resources.
The following diagram illustrates the process:
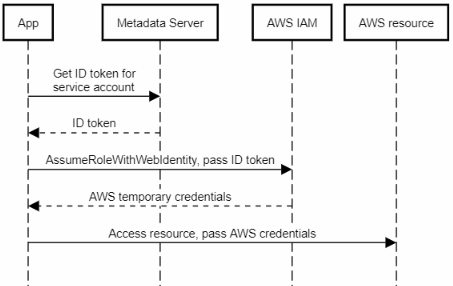
Note that we have to use an ID token. Using a Google access token won’t work for AssumeRoleWithWebIdentity
as it’s opaque and not a JSON Web Token.
Creating a trust policy
Although we don’t need to register Google as an OpenID Connect provider in AWS, we still need to create a role and a trust policy, which is:
A JSON policy document in which you define the principals that you trust to assume the role. A role trust policy is a required resource-based policy that is attached to a role in IAM. The principals that you can specify in the trust policy include users, roles, accounts, and services.
In other words, the trust policy lets us define the conditions that input ID Tokens must satisfy, in addition to being valid JWTs. A trust policy is therefore similar to attribute conditions in Google Cloud’s workload identity federation.
There are 3 condition keys we can specify a string condition for:
accounts.google.com:aud, which matches the following Google ID Token fields:audfor OAuth 2.0 Google client IDs of your application, when the azp field is not set. When the azp field is set, the aud field matches the `accounts.google.com:oaud` condition key.azpwhen the azp field is set. This can happen for hybrid apps where a web application and Android app have a different OAuth 2.0 Google client ID but share the same Google APIs project.accounts.google.com:oaud, which:specifies the Google audience (
aud) that this ID token is intended for. It must be one of the OAuth 2.0 client IDs of your application.accounts.google.com:sub, which we can use to:verify that the user ID matches the one that you specify in the policy. You can use the
subkey with theaudkey for the same identity provider.
Given this definition, we might be inclined to create a condition like this and expect it to work for
ID tokens that contain an aud claim set to aws-trust-1:
  "Condition": {
    "StringEquals": {
      "accounts.google.com:sub": "10036718611111111111",
      "accounts.google.com:aud": "aws-trust-1"
    }
  }
But counterintuitively, this condition won’t work, because Google ID tokens also contain an azp claim:
- For tokens issued to users (as a result of
3-legged OAuth),
azphas the same value asaud. - For ID tokens issued to service accounts
azpcontains the service account’s email address (see example above) whileaudcontains the caller-chosen target audience.
(I’m not aware of any situation where the azp claim isn’t set in a Google-issued ID token,
so I’m not sure when the azp field is not set case would ever apply)
So we have to change the condition to:
  "Condition": {
    "StringEquals": {
      "accounts.google.com:aud": "[email protected]",
      "accounts.google.com:oaud": "aws-trust-1",
      "accounts.google.com:sub": "10036718611111111111",
    }
  }
Note that:
- the
subandaudconditions are largely redundant in practice. The only real difference is that if a service account is deleted and later recreated, it has the same email address, but a different ID. Beyond that, I don’t see big advantages in filtering bysubinstead of only filtering byaud. - Audiences aren’t ACL’ed, which means a service account can obtain ID tokens for any audience. Filtering by audience therefore might add some obscurity, but little extra security.
Let’s turn that into a complete trust policy and save it to a file trust-policy.json
{
  "Version": "2012-10-17",
  "Statement": [
    {
      "Effect": "Allow",
      "Principal": {
        "Federated": "accounts.google.com"
      },
      "Action": "sts:AssumeRoleWithWebIdentity",
      "Condition": {
        "StringEquals": {
          "accounts.google.com:oaud": "aws-trust-1",
          "accounts.google.com:aud": "[email protected]",
          "accounts.google.com:sub": "10036718611111111111",
        }
      }
    }
  ]
}
Now we can create a role by using the following command:
aws iam create-role \
    --role-name google-cloud-myapp \
    --assume-role-policy-document file://trust-policy.json
That’s all we need to do on the AWS side. Next time, we’ll take a look at how we can use AssumeRoleWithWebIdentity in a C# application that runs on Google Cloud.