 Certificate enrollment: Manually creating a certificate signing request
In the last post, we looked at how certificates, private keys, and certificate signing requests relate to another. In this post, we’ll look at three common ways to create a certificate signing request (CSR) which can then be submitted to a certificate authority (CA) for signing.
Using OpenSSL to creating a CSR
OpenSSL is the Swiss Army knife of crypto tools, so almost all examples you find on the web use OpenSSL to create CSRs.
To create a CSR by using OpenSSL, you have to perform the following steps:
Create a new public/private key pair:
openssl genrsa -out key.pem 2048Note that this causes the private key to be stored unencrypted. You can instruct OpenSSL to encrypt the key using AES256 and a password by using the following command instead:
openssl genrsa -aes256 -passout pass:MySecret -out ca.key 2048To request a certificate that does not include extension attributes, it is possible to generate a CSR by using a single command. For a certificate that includes extension attributes, you have to create a configuration file first.
Create a file named
request.cfgand copy the following content into the file.[req] distinguished_name = req_distinguished_name req_extensions = v3_req prompt = no [req_distinguished_name] CN = My Machine O = My Organization [v3_req] keyUsage = keyEncipherment, dataEncipherment extendedKeyUsage = serverAuthNotice that the example configuration specifies
keyUsageandextendedKeyUsage, which are both X.509 v3 extension attribute.Create the CSR by running the following command:
openssl req -new -key key.pem -sha256 -out request.csr -config request.cfgIf you decided to encrypt the private key, run the following command instead:
openssl req -new -key key.pem -sha256 -out request.csr -config request.cfg -passin pass:MySecretTake a look at the generated CSR. First, open the file
request.csrin a text editor and notice how it uses the familiar PEM format with a header that indicates it is a CSR:-----BEGIN CERTIFICATE REQUEST----- MIICpzCCAY8CAQAwLzETMBEGA1UEAwwKTXkgTWFjaGluZTEYMBYGA1UECgwPTXkg T3JnYW5pemF0aW9uMIIBIjANBgkqhkiG9w0BAQEFAAOCAQ8AMIIBCgKCAQEAzYBG ... -----END CERTIFICATE REQUEST-----Now run the following command to decode the CSR and dump the embedded information to the console:
openssl req -in request.csr -noout -textThe output should look similar to this:
Certificate Request:
    Data:
        Version: 1 (0x0)
        Subject: CN = My Machine, O = My Organization
        Subject Public Key Info:
            Public Key Algorithm: rsaEncryption
                RSA Public-Key: (2048 bit)
                Modulus:
                    00:cd:80:46:4a:64:81:9e:ed:1c:11:73:c2:a4:07:
                    64:c2:fc:e3:ef:fc:...
                Exponent: 65537 (0x10001)
        Attributes:
        Requested Extensions:
            X509v3 Key Usage:
                Key Encipherment, Data Encipherment
            X509v3 Extended Key Usage:
                TLS Web Server Authentication
    Signature Algorithm: sha256WithRSAEncryption
         c0:f5:7c:21:1b:76:a9:3a:ad:...
Notice the X.509 v3 extension attributes listed under
Requested Extensions.
Although using OpenSSL to generate CSRs is common practice, there are a few problems with this approach:
- While OpenSSL comes preinstalled on many Linux distributions, it is rather uncommon to use it on Windows. Installing OpenSSL just to generate a CSR certainly seems overkill.
- OpenSSL is extremely powerful, but also rather horrible to use. The tool supports about a million command line parameters, and figuring out which of them to use can be tedious.
- OpenSSL stores the private key in a file. On Windows, it would be much better to store the private key in a Windows keystore.
Clearly, these limitations stem from the fact that OpenSSL is a Unix tool. While it can be used on Windows, OpenSSL does not integrate particularly well with Windows’ own PKI infrastructure and tooling.
Using Certificate Manager to create a CSR
The primary tool for managing certificates on Windows is the Certificate Manager MMC snap-in. The snap-in allows not only allows you to see and manage your existing certificates, but also to request new certificates.
The Certificate Manager snap-in integrates with AD CS, and the default way to request a certificate by using the snap-in is to use an AD CS enrollment policy. But it is also possible to create a CSR without AD CS:
- Open the Certificate Manager by running
certmgr.msc. - Right-click Certificates - Current User > Personal and select All Tasks > Advanced Operations > Create Custom Request…
- Click Next.
- In the list of enrollment policies, select Proceed without enrollment policy and click Next.
- On the Custom Request screen, select
- Template: No template (CNG key)
- Request format: PKCS #10
- Click Next
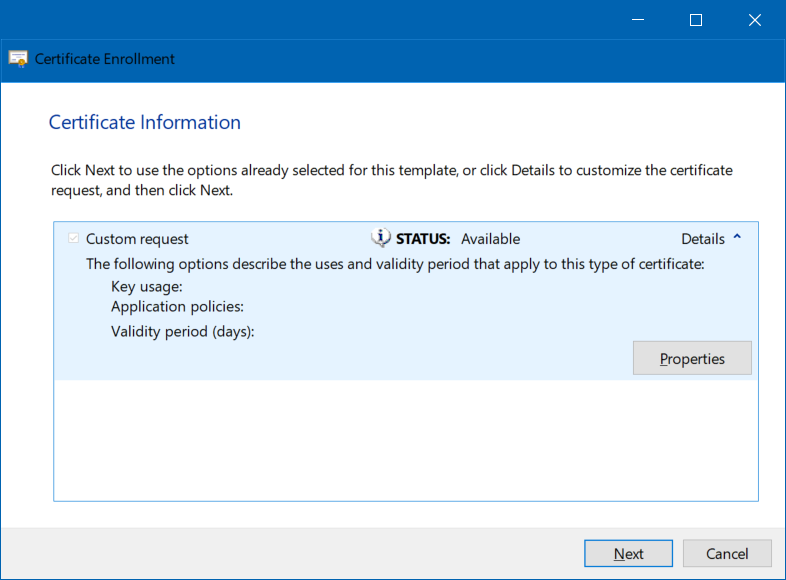
On the Certificate Information screen, click the tiny arrow next to Details, then click Properties
In the Certificate Properties dialog, switch to the Subject tab.
Under Subject Name, use the following settings
- Type: Common name
- Value:
My Machine, O=My Organization
Click Add >.
Switch to the Extensions tab.
Under Key Usage, select Key Encipherment and click Add.
Under Key Usage, select Data Encipherment and click Add.
Under Extended key usage, select Server Authentication and click Add.
Click OK.
Click Next.
On the Where do you want to save the offline request screen, provide a file name and select Base 64 as file format. Then click Finish.
You can now inspect the resulting file by running openssl req -in [FILE] -noout -text, Notice that
the output looks almost exactly like CSR that you created by using OpenSSL before.
Certificate Request:
    Data:
        Version: 1 (0x0)
        Subject: O = My Organization, CN = CN=My Machine
        Subject Public Key Info:
            Public Key Algorithm: rsaEncryption
                RSA Public-Key: (1024 bit)
                Modulus:
                    00:e0:fd:83:...
                Exponent: 65537 (0x10001)
        Attributes:
            1.3.6.1.4.1.311.13.2.3   :10.0.18362.2
            1.3.6.1.4.1.311.21.20    :unable to print attribute
            1.3.6.1.4.1.311.13.2.2   :unable to print attribute
        Requested Extensions:
            X509v3 Key Usage: critical
                Key Encipherment, Data Encipherment
            X509v3 Extended Key Usage:
                TLS Web Server Authentication
            1.3.6.1.4.1.311.21.10:
                0.0
                ..+.......
            X509v3 Subject Key Identifier:
                54:58:A8:B0:A4:DB:57:2D:ED:27:03:63:B9:34:FE:97:12:17:6F:22
    Signature Algorithm: sha256WithRSAEncryption
         17:e7:39:0d:2...
Notice that during the entire process, the snap-in did not request you to provide a private key, or specify a password for protecting the private key. That is because the snap-in defaults to using the Windows CNG keystore.
Using the Certificate Management snap-in requires a lot of clicking, so let us see how we can achieve the same result on the command line.
Using Certreq to create a CSR
Every new Windows version adds hundreds, if not thousand new PowerShell cmdlets – so by now, you’d expect that there should be a PowerShell cmdlet to generate CSRs. But as it turns out, that is not the case – instead, we have to revert to using certreq.
Similar to OpenSSL,
certreqrequires us to prepare a configuration file first. Curiously, certreq uses the INF file format for that purpose.Create a new file
request.infand copy the following content:[Version] Signature="$Windows NT$" [NewRequest] ProviderName = "Microsoft Software Key Storage Provider" Subject = "CN=My Machine, O=My Organization" KeyLength = 2048 KeySpec = 1 KeyUsage = 0xA0 ; Digital Signature, Key Encipherment MachineKeySet = False ; Per-User HashAlgorithm = SHA256 Exportable = True SMIME = False FriendlyName = "My Test CSR" [EnhancedKeyUsageExtension] OID=1.3.6.1.5.5.7.3.1 ; Server AuthenticationProviderNameselects the Windows keystore to use for saving the private key.Microsoft Software Key Storage Providerselects the CNG, and this should be your first choice. Note that many examples in the web still useMicrosoft RSA SChannel Cryptographic Providerwhich identifies the old CryptoAPI keystore.MachineKeySet = Falsecauses the key and certificate to be created for the current user.FriendlyNamedefines the name this CSR should be listed as in Certificate Manager. The setting is not encoded into the CSR or certificate.- The other entries in the configuration file should be self-explanatory by now.
Create a CSR by running the following command:
certreq.exe -New request.inf request.csr
Again, you can inspect the resulting file by running openssl req -in request.csr -noout -text,
Notice that the output looks almost exactly like CSR that you created by using OpenSSL before:
Certificate Request:
    Data:
        Version: 1 (0x0)
        Subject: O = My Organization, CN = My Machine
        Subject Public Key Info:
            Public Key Algorithm: rsaEncryption
                RSA Public-Key: (2048 bit)
                Modulus:
                    00:d9:bf:99:...
                Exponent: 65537 (0x10001)
        Attributes:
            1.3.6.1.4.1.311.13.2.3   :10.0.18362.2
            1.3.6.1.4.1.311.21.20    :unable to print attribute
            1.3.6.1.4.1.311.13.2.2   :unable to print attribute
        Requested Extensions:
            X509v3 Key Usage: critical
                Digital Signature, Key Encipherment
            X509v3 Extended Key Usage:
                TLS Web Server Authentication
            X509v3 Subject Key Identifier:
                81:D1:55:57:85:3F:CA:DA:4B:4D:3C:C6:E7:D0:BF:F7:0C:A3:36:C1
    Signature Algorithm: sha256WithRSAEncryption
         a7:0a:be:97:69:...
Rather than using openssl to insect the CSR, you can also use certutil -dump request.csr:
PKCS10 Certificate Request:
Version: 1
Subject:
    CN=My Machine
    O=My Organization
  Name Hash(sha1): a5b4605ab5b9c0bee37d706bb159813885803678
  Name Hash(md5): d0d1e57ad727e732e95f6ccb6ccfb497
Public Key Algorithm:
    Algorithm ObjectId: 1.2.840.113549.1.1.1 RSA
    Algorithm Parameters:
    05 00
Public Key Length: 2048 bits
Public Key: UnusedBits = 0
    0000  30 82 01 ...
Request Attributes: 4
  4 attributes:
  Attribute[0]: 1.3.6.1.4.1.311.13.2.3 (OS Version)
    Value[0][0], Length = e
        10.0.18362.2
  Attribute[1]: 1.3.6.1.4.1.311.21.20 (Client Information)
    Value[1][0], Length = 43
    Client Id: = 9
    ClientIdCertReq -- 9
    User: ...
    Machine: ...
    Process: Certreq.exe
  Attribute[2]: 1.2.840.113549.1.9.14 (Certificate Extensions)
    Value[2][0], Length = 46
Certificate Extensions: 3
    2.5.29.15: Flags = 1(Critical), Length = 4
    Key Usage
        Digital Signature, Key Encipherment (a0)
    2.5.29.37: Flags = 0, Length = c
    Enhanced Key Usage
        Server Authentication (1.3.6.1.5.5.7.3.1)
    2.5.29.14: Flags = 0, Length = 16
    Subject Key Identifier
        81d15557853fcada4b4d3cc6e7d0bff70ca336c1
  Attribute[3]: 1.3.6.1.4.1.311.13.2.2 (Enrollment CSP)
    Value[3][0], Length = 64
    CSP Provider Info
    KeySpec = 1
    Provider = Microsoft RSA SChannel Cryptographic Provider
    Signature: UnusedBits=0
Signature Algorithm:
    Algorithm ObjectId: 1.2.840.113549.1.1.11 sha256RSA
    Algorithm Parameters:
    05 00
Signature: UnusedBits=0
    0000  eb a1 ca 00 ...
Signature matches Public Key
Key Id Hash(rfc-sha1): 81d15557853fcada4b4d3cc6e7d0bff70ca336c1
Key Id Hash(sha1): 01ced1d2197177ca8b53b88240314d41819b0fc5
Key Id Hash(bcrypt-sha1): 8627eba22390a1fb63d6f685ceb850f3656dadde
Key Id Hash(bcrypt-sha256): 73c1b40111822ec4812835e77a403f11eaa1a7dd1c77484be4b108b790ffbc9d
Notice that the output is similar, but a bit more verbose than the openssl output. The certutil output also reveals that Windows automatically added two attributes to the CSR that encode the OS version and client information – openssl did not recognize these attributes and therefore only listed their OIDs.
Finally, you can take a look at the Certificate Manager MMC snap-in. :
- Open the Certificate Manager by running
certmgr.msc. Navigate to Certificates - Current User > Certificate Enrollment Requests
Notice the new entry in the list of enrollment requests, indicating that there is a pending CSR.
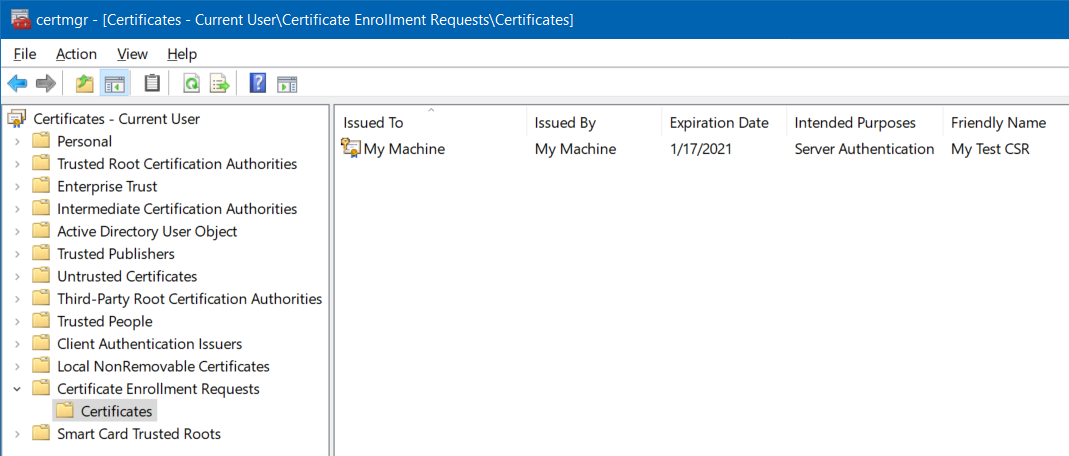
The enrollment request will stay in this folder until a certificate is being installed that corresponds to the CSR.
The next post will dive a bit deeper into how Windows manages keys and certificates and will explore how you can create certificate signing requests programmatically.